

Preventing Spring Showers from Damaging Your Chimney
 April showers may bring May flowers but they could also leave you with a hefty repair bill and a household hazard.
Water is the greatest enemy of a chimney system. If it leaks inside the chimney or seeps into the bricks and mortar it can be destructive from deteriorating the masonry to destroying the flue liner. Without an intact flue liner, your home will be more at risk of a house fire. Flaking mortar and chipping bricks might not seem like a big deal at first but, if it isn’t repaired early on, it can be costly. Water may seep into other parts of your home causing water damage to insulation, wood and drywall. Or, your chimney could collapse if the masonry has deteriorated too much.
These worst-case-scenarios can be avoided but, unfortunately, they happen more often than you might think. Many homeowners do not know the 5 simple steps that you can take to protect your chimney from water damage.
Step 1 – Have the Chimney Cap & Chimney Crown Inspected
A chimney cap, also known as a chimney guard or rain cover, sits over the opening at the top of the chimney. It blocks rainwater and snow from falling down the flue pipe into your home while still allowing the chimney to vent properly. It has a wire mesh along the side that stops birds and other animals from making nest in the chimney and catches any stray embers from the fireplace from landing on the roof. Leaves, twigs and other debris are also prevented from clogging up the chimney.
During the winter, a chimney cap can become loose or get damaged by high winds or fallen limbs or tree branches. Along with the risk of damage from severe weather, the natural wear and tear of time will also corrode the chimney cap. Rust can eat away at it creating holes that will let in water and critters. This is why it is important to have it inspected at the beginning of spring, before the rainy season begins, so that any damage to it can be quickly mended.
The chimney crown is as important as the chimney cap. It is the cement layer that surrounds the flue opening that acts as a water barrier for the masonry, stopping melting snow and rain from seeping into exposed mortar and bricks. A properly poured crown will slope slightly so that water runs off it. It will also have about a 2-inch overhang so that the run off falls away from the chimney.
Even though a well-made chimney crown can have a long life, it will still deteriorate over time. If it only has a few small cracks, it can be treated with a sealant that will prevent moisture from penetrating through it. If there are deep cracks or missing chunks of cement, it should be replaced.
You can climb up onto the roof to inspect these components yourself but it is best to leave this job to a certified chimney technician who had the right equipment and training.
Step 2 – Replace a Warped or Rusted Damper
The damper is the fireplace component that controls the airflow in the flue. It is also the last defense against moisture entering the firebox. When the damper becomes rusted or warped, moisture in the chimney can easily enter the firebox where it will have a corrosive effect. If your fireplace has become draftier, it may be a sign that the damper needs to be replaced. You should be able to see the damper by taking a look at toward the chimney through the fireplace with a flashlight.
Step 3 – Repair Crumbling Mortar Joints
Chunks of missing mortar isn’t just an eyesore, it also allows moisture to freely enter the masonry which will cause the damage to spread. The reason why masonry is so adversely affected by water is because mortar and brick are both very absorbent. If they have absorbed significant amounts of moisture, when the temperature rises and falls, they will freeze and thaw. That process will make the masonry expand and contract, the more it does this, the more the mortar and brick will crack and break. To prevent this, deteriorating mortar joints should be repaired or repointed.
Repointing is the most common way to repair mortar joints. When it is done well, it will significantly improve the appearance of the chimney and increase its life span.
Step 4 – Apply a Waterproofing Agent
Applying a waterproofing agent to the outside of the masonry is another way to protect it from absorbing too much moisture. There are a number of good waterproofing products that have been developed specifically for chimneys. These agents are 100% vapor permeable which means that they will allow the masonry to breath, releasing water vapors produced by the combustion process, but will prevent external moisture from seeping into the masonry. Most of these products have a 5 to 10 year warranty which makes them a great investment for homeowners.
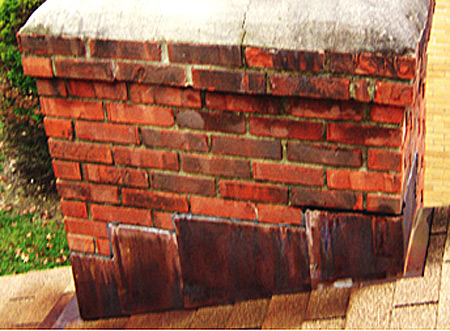
Step 5 – Replace or Repair Flashing
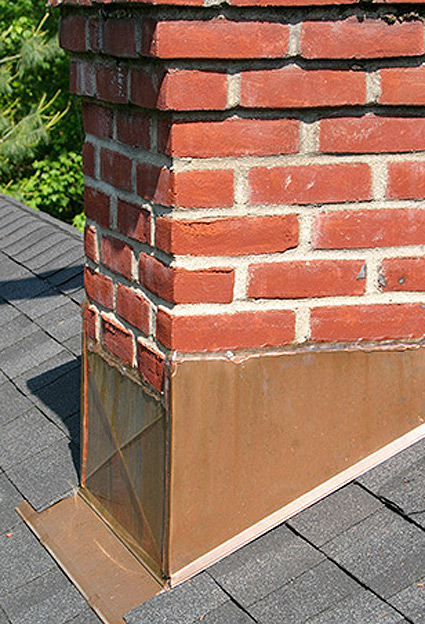 Flashing is the weather resistant barrier that connects the chimney with the roof. This weather resistant barrier prevents water from seeping in between the gap between the roof and the chimney. It plays an important role in reducing indoor mold problems. To prevent leaks, the flashing on your roof should be check regularly and should be replace or repaired if it was originally installed improperly or has been degraded.
If you are hesitant to climb up on the roof to make these improvements, don’t worry! A certified chimney technician can take care of it for you. The CSIA certified chimney sweeps at Hudson Valley Chimney Service provide weather proofing and inspections for homeowners across New York’s Hudson Valley and Westchester County. Now is the best time to set up an appointment! Give us at Hudson Valley Chimney Service, Inc. a call at 845-471-1071 if you live in the area!